Visar inlägg med etikett underwear. Visa alla inlägg

lördag 1 juli 2017

Steampunk cage crinoline

I have finally summoned energy and inspiration at the same time, and managed to finish the first piece of my work-in-progress steampunk forest dress (which is also my first finished costuming piece this year). It is a crinoline, based on an 1850s/1860s cage crinoline. It is meant to be partly seen under the skirt of the dress it will be worn with. My idea was to have a marked contrast between a green and organic feeling of the dress, and a crinoline with a distinctly mechanical, metallic and man-made feeling. This is what I ended up with. It is decorated at the part where the skirt will be raised to show the crinoline.

The crinoline, here worn without any skirt.


I made the decoration pieces from craft foam, first glued together, then with some layers of wood glue (to seal the pores of the foam), and then finally several layers of paint. I also added some metal parts from my box of might-be-useful-some-day pearls, old electronics, and wires. For an impatient person like me, that was a lot of waiting for things to dry (also, glue is smelly)... When sewing, of course it can take some hours to pleat and sew on  a piece of decoration, but then at least I am doing something. Except for the waiting time however, it was very fun to work with foam! It is so easy to cut out, does not fray like fabric or warp in water like cardboard, and you can build three dimensional pieces by stacking flat pieces or gluing them together.
The decoration pieces, mostly made from craft foam

Of course I could not resist some gears on a steampunk garment - they are really tiny thou! And something mechanical from a watch.
The construction of the crinoline took some considering. Drafting it was quite easy, as I based the measurements on my 1860s hoop, but made it shorter and slightly wider at the top, to get a more pronounced skirt shape. Figuring out how to make it hold together was harder. Most crinolines I see made today either have the steel hoops coated in fabric and then sewed to the vertical bands, or is made of fabric with the steel hoops sewn in. I wanted the steel hoops to be seen, so covering them in fabric was not an option. I was not able to find a description of how to make it like I wanted, so I had to make something up myself. Making them stay in place vertically is easy, just make loops in the vertical bands and run the steel rings through, but how to prevent the vertical bands from sliding around the steel rings and the distorting the shape? I didn't trust glue to hold, so I ended up making using tape, see picture. Then I covered the bands with steel coloured fake leather, to get as much metallic look as possible while keeping it possible to flatten and store it.

Here, only one of the vertical bands are covered in silver false leather, and the hoops are not yet taped.


Here, the tape I used to prevent the steel hoops from sliding is visible, before they become covered by the silver false leather.

Next picture is a preview of what it might look like with the dress on.

Preview of how the crinoline will be worn with dress (which is not at all finished yet)
The dress is not nearly finished, but I show it to give some idea of the context where this crinoline will be worn. Now, I need just finish the dress, and the shoulder piece, and the attachable sleeves, and the hat, and some kind of harness for some leather bags I have to make or find, and preferably some matching jewellery. Suddenly, it does not feel so long to the beginning of September (when I hope to first wear this dress) anymore...

torsdag 17 mars 2016

Early natural form skirt support - me-made

In my previous post, I wrote about my research of early natural form skirt supports.

This is what I ended up making. I will not go into details of how I made them, but just show the result, and the HSM facts.

As mentioned in the earlier post, I based my bustle and petticoat on these ones:


I chose to make the gathering in the form of a drawstring, because I then can let them out and use the petticoat for bustle dress if I want. I think I have read something on how women would convert their bustle fashion petticoats to the later slimmer fashion by adding a drawstring like that, but I am not sure where I read it. I used the same pattern as I will use for the skirt - Skirt with train from Francis Grimbles Fashion of the Gilded Age (this book is a  fantastic collection of period patterns and texts on the natural form era, but as it starts 1877, it could not entirely help me with the transitional fashions of 1876.) My petticoat closely reassembles the one made by Lisha Vidler at Yesterday's Thimble, and she made a very good tutorial (which I did not follow due to laziness), so for details on how to make one properly, look at her tutorial.

The bustle is just made up, without any attempt at period correctness or even neatness. I just made channels, and experimented with the length of each bone until I got the shape I wanted. This is the result:

 Worn with this one underneath:
The Historical Sew Monthly Facts:
Challenge: Protection

What is it? Petticoat (and bustle) for the transition between early bustle and natural form.

Why is it protection? The train of the petticoat will protect the skirt train from dirt from the ground.

Year? 1876. Will work for other years by adjusting the width of the back with the drawstring.

Pattern? I used the Skirt with train from the book Fashion of the Gilded Age by Frances Grimble, and added drawstrings in the back panel to adjust width, and the flounce. For bustle - none, just made it up.

Fabric? Bedsheets, plain cotton for flounce, and mysteroius white fabric from stash for bustle


Notions: tapes, synthetic whalebone for bustle


Time? Maybe 5 h for petticoat, 4 h for bustle. Plus lots of hours to figure out which model of petticoat and bustle to use.

Cost? Bedsheets from linen cupboard. 80 kr for the flounce fabric.

How historically correct is it? Petticoat is based on a period pattern, and pictures from ads from the time, so the look and shape is ok. Construction methods are not- I did whatever I felt was easiest, as I had not much inspiration/energy left for making after all the researching. Also, I am sure that someone affluent enough to wear a long train like this would have had fancier fabric than this in her petticoat. And there seems to be lace on almost all petticoat flounces I have seen, but I skipped that for cost reasons. 

Bustle is decent in the resulting shape, but no attempts are made at using historically accurate materials or construction methods.

First worn: just for photos, yet.

I learned a lot in figuring out these ones - a fun challenge!

Early natural form transitional skirt support

This is a quite long post. In short, it is about my research about what types of skirt supports and petticoats that could have been worn under a trained 1876 skirt - a transitional year between the very full skirts of early bustle era and the  narrow natural form.


How to get this shape of skirt, that is the question of this post.


Introduction

Somehow, my first historical sewing project of the year turned out to be an early natural form dress. Two months ago I did not even like natural form, but all it took to change my mind was an enthusiastic friend showing some pictures :-) As I want to do the transition between "late early bustle" and early natural form years, ca 1876, I have been thinking a lot about petticoats, crinolines and bustles. I could even go so far as saying I have been a bit obsessed by skirt supports lately... As usual for me, I concentrate on the fashion of those wealthy enough to follow the latest fashion.

Terminology:

Before I start properly, I will define some of the terms I intend to use. By structural support, I will be meaning any kind of skirt support that either has boning in it or serves only to add volume. This includes for example boned bustles small and large, crinolines, and the smaller ruffled horse-hair bustles. Petticoats on the other hand could add a quite considerable amount of support if they have ruffles, cording, tucks, is heavily starched, or some other trick used historically, but they are still basically a skirt. (Petticoats with built-in boned bustles will be structural support, for this post...)

The challenge

Transition periods in clothing are interesting but tricky. Nothing is as clear as for the typical dresses of an era.
For early bustle period, there is the typical bustle dress, and good patterns are available for bustles and petticoats. 
Day dress with the big bustle skirt 1870-72
1870's bustle (from the Met)

1870's bustle
For the narrower form of natural form, the only support needed would probably be a petticoat with lots of ruffles (and maybe a small tournure), or a slimmer bustle with small horse-hair ruffles 

1879 dresses from La Mode Illustre
1881 dresses from magazine "the Queen"

A slim 1882 petticoat with ruffles
Early 1880's horse-hair bustle skirt (from the Met)


 But in between? What happened to the bustle between these two extremes, as the skirt narrowed, and how fast did it happen? The shape I am aiming for is like in these fashion plates from 1876-1877.


Little addition at hips, quite a lot volume that needs support at knee height, and a train that needs some volume and protection. The question does not get easier by the fact that the choice of a structured skirt support (bustle, crinoline, ...) and choice of petticoat is by no means independent. For full blown bustle dress, you'd obviously need a bustle, but for smaller fashions, the same shape could most likely be achieved either with some structured support and a plainer petticoat, or by using petticoats with lots of volume.

Method 

In trying to figure this out, I have been reading blogs and webpages of other people making natural form underskirts, and I have been looking at fashion plates, advertisements from the period, and pictures of extant garments.

Other people's work

Searching and asking, I found some other people had been doing the same.
I will not put their pictures here, but follow the links to see their great work!
Historical Sewing made an 1876 trained and ruffled petticoat with corded ruffles, and made a good tutorial.
The Modern Mantua-Maker made a full set of underwear for first half of natural form era, including petticoat with ruffled train and a boned skirt support. 
There is the Truly Victorian 1879 Petticoat with Detachable Train.
And Yesterday's Thimble has a good tutorial for an 1876 Petticoat with train. 

Period options

 Looking mostly at advertisements from the time, I found a number of options, depending on how much support you need and where you need it (hip, thigh, knee or ankle height). 

Petticoats

Petticoats with more or less ruffles:

1876, from the Met

Petticoats From Demorest 1877-1878

Petticoats from Buttericks 1878

Trained Petticoat—Harpers Bazar, 1876

Bustles


1876 bustles from The Ladies's treasury

1876 petticoats and petticoats+corset cover, with built in bustle, from Le Moniteur De La Mode

Crinoline like type

A skirt support from a period source, reprinted in Fashion of the Gilded Age
A number of hoopskirts and tornures, 1883.
The latest picture is from 1883, a bit later than mine, but it is not improbable that this variations have been around earlier as well. At the least, it illustrates how many sorts of skirt supports that were available at the same time.

My conclusions

From reading other peoples work and looking at period information, I got the conclusion that just one petticoat would not be enough but that several probably could work. That meant that the choice was either to make at least two petticoats, both with lots of ruffles, or making a structured support and get away with a plainer petticoat, with only enough volume to hide the boning of the structured support. From what I could see from my advertisements, both options could be plausible. Comfort spoke for the second alternative. I find padding with petticoats to be a lot heavier and warmer than using a crinoline/bustle to get the same volume. Also, laziness did - I think it will take me less time and energy to make structured support+petticoat, than it would take to make several petticoats with lots of ruffles.

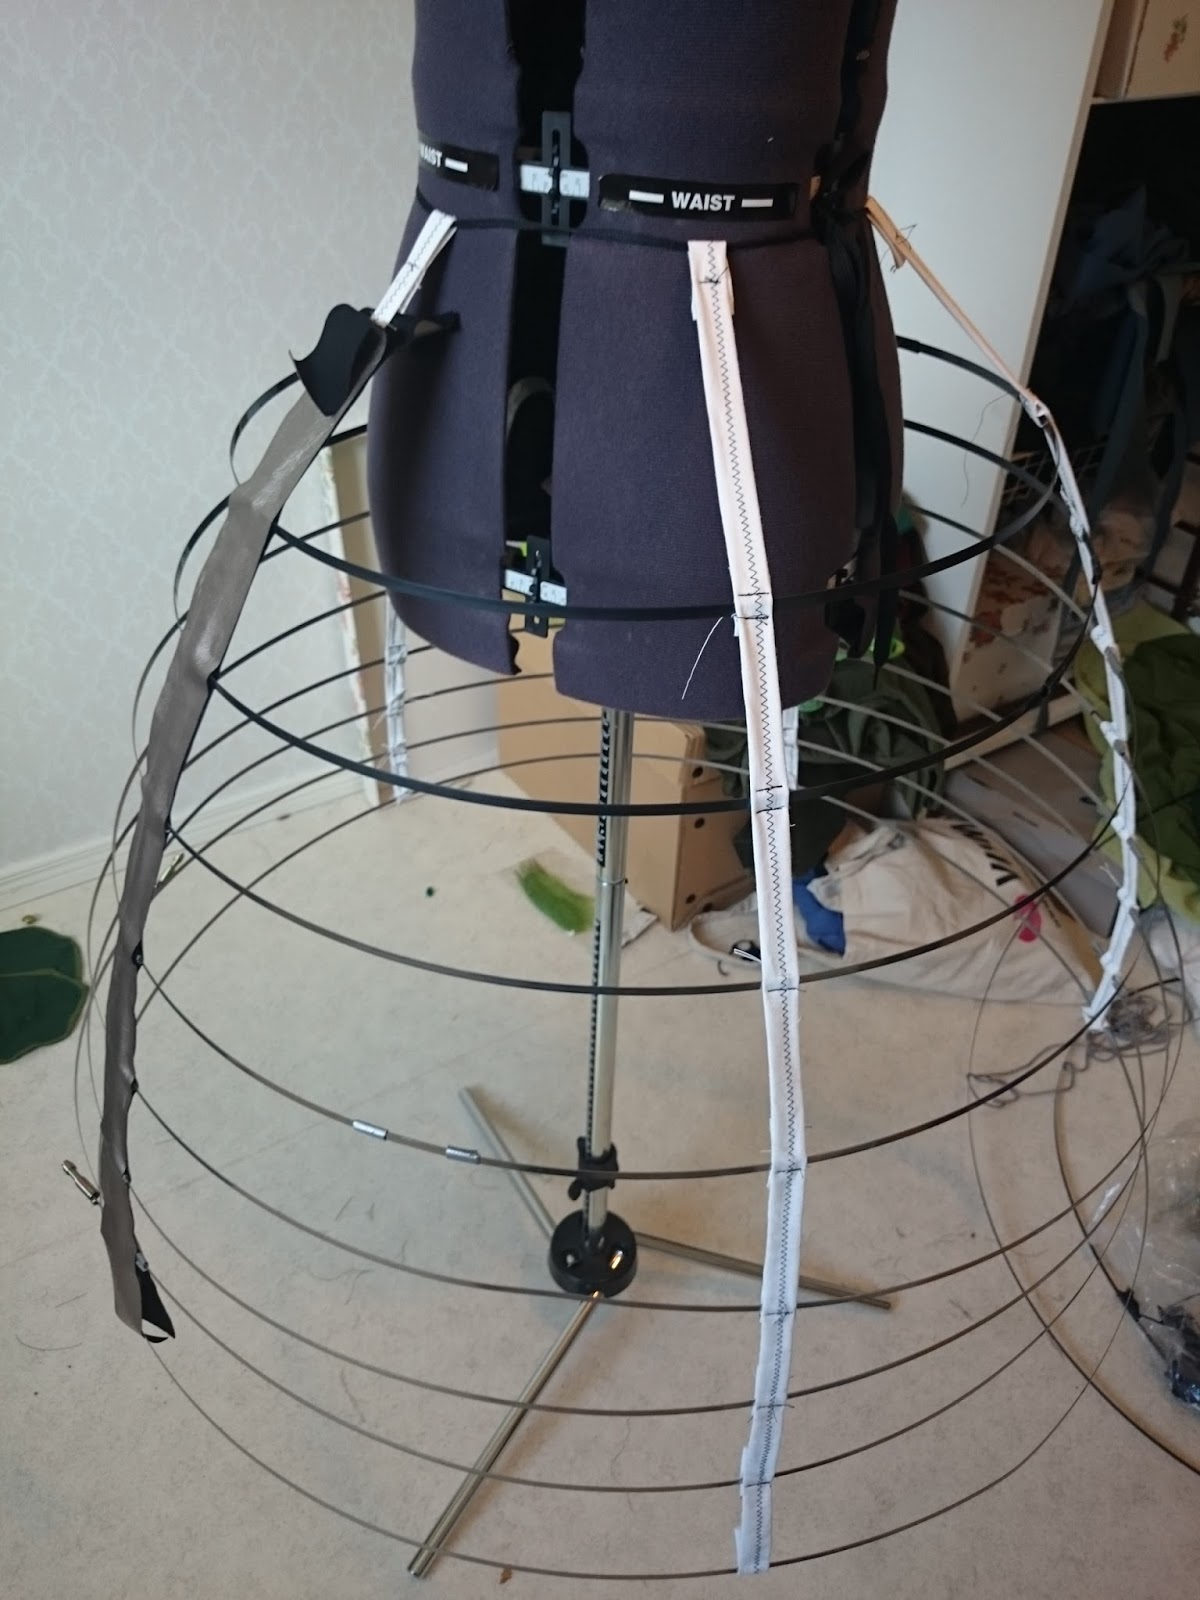
After way too much thinking (obsessing?), I chose to base my work on this one:

 It has some support all the way down, including some for the train, which means minimal need for petticoats with heaps of flounces. For petticoat, I chose a simple one with only one ruffle, and gathers in the back to control the amount of fabric. It is based on this one, and very similar to the one on Yesterdays Thimble:
I made mine with a longer train, to support and protect the train of my skirt. I decided I did not need the versatility of a floor-length petticoat with a separate button-on  train.

Limitations of this work

I have not read any text sources, only looked at photographs and pictures of structured supports and petticoats. This means that I have no period information on how thay were actually worn and which combination of support and petticoats that would have been common, only own conclusions. Also, I have never handled a petticoat properly made to give lots of support (for example a starched one with lots of ruffles and cording). Thus, I do not know for sure how much support they actually gives - I might be underestimating them.
In next post, there will be pictures of my bustle and petticoat!

söndag 3 maj 2015

1860's plans and progress

When I found out that there are two interesting events in the time period 1840's-1860's, one of them here in Linköping, I realized that I "needed" a new gown. That meant deceding where to start with an entirely new time period - somewhat a challenge in itself! I enjoyed a lot of time browsing pictures of extant dresses on Pinterest, to try to decide more precisely what to make. Making an corded petticoat seemed to demand way more patience than I think I can muster, so that narrowed down the time span to steel hoop era, 1856 and on. I also wanted a circular  hoop, not elliptical, in order to reuse my Tudor farthingale. Another guide in choosing was that I wanted a dress that was made of colourful and patterned fabric, so that ruled out the sheer muslin dresses. Finally, I decided on a model to use as inspiration. As a bonus, that dress turned out to be one of the dresses in Janet Arnold's Pattern of Fashion! That settled it - pretty dress, and a pattern drawing and description. It is from 1861/1863 and made of a patterned silk.


In my version, I found a printed rayon fabric, dark blue with flowers in lighter blue nuances. The drape of the fabric is probably very different from that of a silk, but I liked both the pattern and the price, so it will have to be good enough. As a first time dress in a new time period, it is nice to be able to buy some extra fabric and not have to worry too much about wasting fabric if I would make a mistake in cutting or sewing.

I started of by modifying the farthingale from the Tudor dress to be  a bit more bell shaped and less like a cone, by adjusting the circumference of some of the hoops. Then I made a petticoat to go over it (lesson from the Tudor gown - never skip the petticoat!). I used the free hoop petticoat pattern from Truly Victorian, but with old sheets instead of eylet fabric - less pretty, more hemming, less cost.


Then, I started with the skirt, using the Patterns of Fashion pattern as a guide. I flat lined the skirt with a light cotton, as the rayon fabric is quite soft and don't want to lie still when I was working with it. It seems that skirt if this time could be either flat lined or made up with a separate lining, so I just chose the most appropriate for my fabric. Pleating 4.5 m of fabric onto the waist band was a bit of the challenge, and it turned out to be just as bulky as Patterns of Fashion said. Let's just say I understand why skirts became gored instead of straigth just about this time... I like the look of the double box pleats thou. Here is the skirt, done except for hemming. I will skip hemming for now, while deciding if I have time and patience to do all those wedge shaped cut-outs on the hem that my inspiration dress has.


 Now - eagerly waiting for the pattern for the bodice to arrive!


söndag 1 mars 2015

1903 Petticoat

Me trying to pose with proper s-bend in the new petticioat
First, all the facts for Historical Sew Monthly.

What the item is: 1903 petticoat.

The Challenge: #3 Stashbusting: Make something using only fabric, patterns, trims & notions that you already have in stash.

Fabric: Vintage sheet with lace and embroidered monogram from my husband's grandmother for skirt and flounce. A softer modern sheet from my grandmother for the flounces. A woven design from what was left of a table cloth I made a blouse of ten years ago, used as decoration.

Pattern: Truly Victorian 1903 Trumpet Skirt (TVE21), with added flounce and ruffles, based on petticoat advertisement pictures. I first made up the skirt, and put a ruffle on the bottom of it. I then added a flounce that also has a ruffle on it.

Year: works  for 1900-1905

Notions: Polyester thread. Hook and eye.

How historically accurate is it? The arrangement with flounce and ruffles is period. I think cotton could have been used for an under petticoat as this, but wool or silk would maybe have been more common? Machine sewing is ok. I did not use period construction methods.

Hours to complete: ca 10 h.(It took quite long time to make all those ruffles, and put on the lace and band decoration. I asked myself quite a few times why I had decided to put a ruffle on a 4 m long flounce...)

First worn: for photo yesterday.

Total cost: 0, as all fabric was gifts or left over from other projects.

 First: I love my hemming presser foot! I works well for the thin fabrics I used for ruffles. Without it would have been quite tedious to hem 10 m of ruffle fabric. (For the second ruffle I cheated and the used selvage instead of hemming.)
Hemming ruffles


 And then: more pictures!

Petticoat before flounce and ruffles
The skirt without any ruffles or decoration except for the tucks. Up to this stage, it went quite fast. Then ruffles occured...

And the finished petticoat, worn over the corset and corset cover, and a bum/hip pad.

Finished petticoat


 The decoration: tucks, a band cut from what was left of an table cloth , and lace (or what it is called) insert. The petticoat seems to give volume quite well! Remains to see how effective it is when a skirt is worn on top of it.


The flounce with its ruffle, and the ruffle on the skirt under.

It is not so visible in the picture, but the flounce has my husband's grandmother's embroidered monogram on it.


I surprised myself a bit when I decided to put some extra effort into this petticoat, to make it look nice, not just give the proper shape. Normally I just make the under layers simple and functional, to get on with the layers to be seen. But now, I had some inspiration from fellow costumers, that really inspired me to do something extra with this. It was fun! But now I am wondering if I might perhaps be able to use this as a summer walking skirt, if I make a matching blouse and a belt. What do you think? Would it look too much like underwear?

tisdag 10 februari 2015

18th century part 1 - underwear


About two years ago, a friend talked me into doing 18th century with her. At first, I was not too thrilled of the idea. To me, 18th century was pastel colors and hair in piles of curls, neither being a favorite of mine. But as I had no other projects going at the moment, and since it seemed very fun to have a project together, I let myself be convinced. When I started looking into the period, it turned out to be not as bad as my initial feelings. Not bad at all! In fact, I soon wanted to make several different dresses. 

But first, there was the underwear. Apparently I was not standard sized compared to the corset pattern, so I had to do a lot of adjusting to make it fit reasonably. It is boned with spring steel, and perhaps more heavy than I need. It is a bit ugly, and I could not convince myself to do the lining, but it will probably be used something like once a year, so I guess it will hold. I also made a very simple shift, entirely machine sewn from an old bed sheet. As I meant the costume to be later part of 18th century I also made a bum pad, after reading the excellent test of different variations of bum pads on demodecouture.


  I also made a “quilted” under petticoat. The petticoat is made of a white bed spread I got for free several years ago and kept just in case I would ever get into 18th century and need an ugly quilted petticoat… It is not good to actually get use of these type of old hoardings- how can I ever stop buying nice-to-have fabrics if they prove to be useful from time to time? The fabric is very synthetic and not even quilted properly, rather the layers seems to have been glued or melted together. It gives lots of volume to the skirt thou. I guess it is a close relative to American Duchess' “ugly puffer” … This petticoat is not based on anything period, but I am mostly concerned with getting the proper siloutte for the outer wear, and this really gives volume. 


The pockets are made from an embroidered table cloth I got, that I pieced together and added a bit more embroidery to. The pattens is not perfect, but it is period to use non-matching strips of printed fabric to bind them, according to , so I used scraps from the caraco (which will be presented in next post).
Then, it finally was time to move on to the parts meant to be seen.

måndag 2 februari 2015

HSM #1: Foundations

The Challenge: #1 Foundations
Fabric: Medium weight cotton canvas
Pattern: Truly Victorian 1903 Edwardian Corset
Year: 1903
Notions: Polyester thread, grommets, cotton bias binding, steel busk, steel and plastic boning from stash
How historically accurate is it? As far as I know, the pattern and shape is very period. It is also very period to use the extra padding in the top that I needed to put in... I'm only interested in getting the right shape for the outer garments, so I just followed instructions in the pattern, and used what I had at home.
Hours to complete: 10-20?
First worn: Not yet, as I need outer garments first...
Total cost: around 30 $
And the staring-face picture:


In its finished state, the fit of the corset seems good enough. There was some some confusion along the way thou. The pattern stated that this kind of corset could not, and should not, be fitted with a mock-up, as the point of the corset is to shape the body and change the posture, and all the boning is needed for that. So I promptly ignored that advice, made a mock-up, put a fake busk (a wooden ruler...) in front, and saw that the fit was really weird. The hip and waist was good, but it was way too big over the bust. I re-took the measurments, and they were correct. Mysterious.


I then realized that I should probably do as the pattern said, threw away the mock-up, and made up the corset properly. It was still just as big. Is was very common back then to use padding in the top, to get the large pidgeon-bust, but this seemed a bit excessive. Fortunately, it was possible to make a dart in the bust cups, to make it a bit closer to me. I still use padding both over the hips and at the bust, to create more curves without having to sqeeze the waist. I'm not fond of corsets, so this actually has my natural waist size. This one is meant more to hold the padding than to move things around.

I also made a quite ugly corset cover. It is just meant to be something to put enough ruffles on so that the top of the corset does not show through the blouse, and to add a bit more to the pidgeon breast look. It is historically correct to have ruffles, but otherwise I just made it up as simple as possible. That is probably not historically accurate - this period seems fond of pretty elaborate lace creations for underwear.


 Perhaps it is obvoius that I am not that fond of making the foundation wear? Maybe I should learn to stick to one time period, so I don't have start all over with corset and underskirts...