Visar inlägg med etikett Edwardian. Visa alla inlägg

söndag 4 november 2018

Edwardian Vampire

I was invited to a "haunted board-game night", which gave me the opportunity to do a costume I have been wanting for a long time: a white lace ca 1905 dress, here used for a vampire. Those dresses are fabulous, but a bit daunting - to source and sew on all that lace in a decently historically accurate way seems expensive in both time and money. So, I made a "quick and dirty"  version!

The skirt is my 1905 underskirt, and the overskirt is a lace curtain pinned in place. The belt is a new, as is the blouse. I used the pattern I made for the 1905 blouse, and lengthened a bit in the waist. The sleeve got a pouf at the wrist(as typical for the time) and I cheated with the cuff - it is just wide enough for me to get my hand through without buttons (remember, this was supposed to be a quick make - fastenings takes a lot of time at least for me). As I happened to make the blouse too wide over the shoulders, I put three pin tucks on each shoulder - much easier than ripping off the sleeves and re-cut the bodice, decorative, and also historically plausible. There is only one hook and bar at the neck, and then the collar is pinned. I also omitted all kind of finishing fabric edges. The cotton I used is not too fraying, and I don't expect to use this more than one or a few times.

The facts:

What is it? An vampire dress inspired by 1900-1910 lace dresses.

Material: cotton ( bed sheet for skirt, duvet cover for blouse), silk/hemp fabric for the belt, dead dino (a k a some random synthetic fabric) lace curtain, cotton embroidered lace.

Pattern: skirt from Truly Victorian, belt and blouse drafted by me.

How historically accurate is it? Not much!  The skirt is good in construction for an underskirt, but would typically have been silk, and obviously not seen. Overskirt is not even following the shape of the skirt. Blouse have the right shape and the pin tucks are ok, but the lace placement is not. Also, is way too sloppy and in too cheap materials for a dress of this kind. Good it was never intended to be historically accurate, or even to be worn in good light conditions!

Hours to complete: about 2-3 h for the new parts, that is, the blouse and belt.

First worn: at a haunted board-game night with some friends.

Total cost: 0, as everything was remnants of other projects, from my stash (and the lace curtain is still usable as curtain!). 129 sek if I add the cost of the red lipstick...

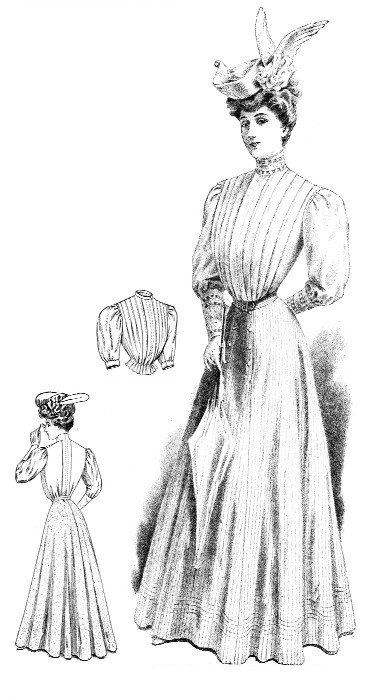
Finally: this is the kind of dress I was inspired by.  You can see why a proper one is not something that one makes without quite a commitment!

tisdag 10 april 2018

First International Random Turn of the century Meetup

Last Saturday, I went to the First International Random Turn of the century Meetup. Or was it the Swedish-Russian Costumed Small-town Walk-and-talk? Or just the smallest meeting you could have without talking to yourself (which I often do, but that is not the point here!)?

But let me start from the beginning. Since some weeks ago, I had gotten desperate for a costuming event. As almost all costumed events around seems to be in the late spring or summer, I had to fix it myself. I decided to just ask in the fb group for Svenska 1800-talssällskapet (Swedish 19th century society) if someone wanted to dress up and come to Nyköping and have fika (coffee and sweets). Luckily for me, Daria Romanova answered, and we arranged to meet last Saturday.

We started at a nice Caffè, and soon discovered that we had lots to talk about.

Except for nice company and very sweet sweets, they also had very very large tea cup - my cup was so large that it took me a while to realize it was a tea cup and not some bowl put on my tray for a mysterious reason... But I guess it goes well with my quite large hat.

We then took a walk, on the look for beautiful houses. Daria lives in St Petersburg but are moving to Stockholm, so I was honored to show her a small Swedish city. (But I guess most Swedish cities are small, if I remember right St Petersburg in itself have a larger population than all of Sweden.) We found nice houses, cold wind, and got quite a bit of attention. Nyköping is proud of being a very old city, and tend to focus on the medieval times, when King Birger imprisoned his brothers Duke Magnus and Duke Valdemar and threw away the key. I definitely think our small "reenactment" was more civilized. This also means that the people of Nyköping probably see some 14th century dresses in the summer, but very few 1905 and 1910 ones in April.

The day passed quickly and we hardly had time to go home to me and look in some costuming books.

All in all, I am glad that I asked, and that I dared to meet up with a stranger, although it was a stranger with the same interest. Costume event does not need to be large or have lots of things planned to be fun! Have you made or been to a small informal meeting? How was it? Please comment and tell!

Also, check out Darias work on Instagram, nickname Romanova_art  - she is a very skilled costumer!

onsdag 16 augusti 2017

The joy of putting stuff on hats

Hats! I love making hats!

1905 - big!
 But why this sudden declaration of affection, you might wonder? Well, todays theme in Costume Blog Writing Month is small project, and that had me thinking. I very rarely do project that in their entirety are quick and easy enough that I could call them small, but I do make smaller garments as part of the bigger project. Interestingly, it is often those parts I end up liking the most. Liking both as in enjoying making them and as in liking the outcome. And a typical "small part project" for me is a hat. The hats for the historical eras I like are, to put it mildly, heavily decorated, which makes it very fun - I can really be creative with them. And generally I can make or adapt/decorate a hat in 2-5 hours, which I would call quick compared to a 30-40 h dress. So, here they come, a collection of some of my small projects, mostly hats.

Before and after modification...

Look how happy I get in a historical hat! Or is it the knowledge that I will soon be eating ice cream that put that smile on me?

The first hat/headdress I made, for my Tudor dress like ten years ago. The dress is scrapped, but I still like the hat.

1860's - a bit pinker than I generally do.


I didn't hear "over decorated" did I? the 188o's really liked to put stuff on their hats!
This got to have two pictures because it is biggest! :-) Also, it is one of only two hats I have that are actually useful for protecting me from the sun.

Slightly weird Tudor/steampunk hat.

Not a hat, obviously, but decorating it was a small a fun project just like the hats.
The most recent one - steampunk. Currently I am adding more decorations to it - neither my hats nor steampunk aestethics in general are known for "less in more"

Do you like making hats too, or what is your favourite small project?

fredag 1 januari 2016

Looking back at 2015

At the beginning of the new year, I will start classically by summing up the last year. Last was very productive for me sewing-wise. This was due to two things. The first was that I joined the Historical Sew Monthly (HSM), which meant a deadline each month. As I have only been sewing at vacations before, this meant that I got a lot more sewing done. The second thing was that I got in touch with some more historical sewing people here in Linköping. As sewing together is much more fun than being nerdy on my own, more people to sew with meant that I was inspired to keep up the speed in sewing. In all, I managed to get the first nine HSM challenges done. Then, my project did not fit the challenges.

So, what have I done? I started a new time period, Edwardian, with the practical 1905 outfit (that turned out to be not so practical, as the heavy underskirt pinched my stomach through the corset, the hat is large, and I could not dress myself as there was hooks and eyes at the back that I could not reach.) Still, I liked it. This project involved making an Edwardian corset (HSM challenge #1 foundations) and corset cover, an underskirt (HSM#3 Stashbusting), a skirt and a blouse (HSM #5 Practicality). 


For the turn of the century days I went to with some friends in August, I could not resist making a more upper class version, with a lace blouse (thrifted), reshaping the hat, and making a bolero and belt. I am really happy with the shape I managed to get by the use of lots of bust and hip padding.


Next big project was the 1860's afternoon dress from the book Patterns of Fashion - another new time period for me. Surprisingly, despite the large crinoline this turned out to be one of my most comfortable dresses. I modified my 16th century farthingale to get it more bell shaped instead of cone shaped. Then, there is the skirt, bodice, and undersleeves, and decorating the bonnet. (This was HSM #6 Out of your comfort zone)


In September, I started the last big project of the year - a ca 1880-1890 walking dress from a fashion plate. This will be a sneak peak, as I have not yet blogged it. As the dress neared finishing, I made the vest a bit steampunk by using large hook for fastening, as I was going to wear the dress at my Steampunk larp. I am currently making a period correct vest as well, so I can choose. This outfit consists of a skirt with soutache, and a coat with a false vest attached.


I also made some smaller stuff, to complement dresses I already had.
An over skirt and a new hat for the 1886 dress (This was HSM #2: Blue and #4 "War and Peace")

A "gröntröja", green bodice, for my mother's Gagnef folk costume. (HSM #8 "Heritage and Heirlooms")
Two Tudor caps, constructed in two different ways.  HSM #7 Accesorise.


Crazy stuff: A 18th century inspired dress in grocery store paper bags for a competition (sadly, I did not win anything...)

I also did a remake of the striped 1880's bodice, by adding a false vest and blouse. This way, it got a bit bigger (much needed!) and also a bit more fancy. I also added lots of trimming to the hat belonging to the same dress (HSM #9  Colour Challenge Brown).

After this year, I can confidently say that I have overcome my fear of making button-holes, after making a shirt and two bodices with buttons! I have also arranged a steampunk larp and a historical costume "fika", won a costume competition award, and been to at least five19th century markets or gatherings, so this have been a busy year for the historical costuming part of me! Plans for next year will come in next post.

söndag 30 augusti 2015

Upperclassing the 1905 dress

Last weekend, I went to turn of the century days in Marstrand with a group of friend, and as you all know, for an event you want something new to wear. I had already remade the 1885, but with two weeks left, it was plenty of time to make something more. (Not really, but still...)

 I knew I had to make a hat, so I took my straw hat, drenched it in water and unpicked the crown, and sewed it togheter with a more cylindrical shape. I then added a very sturdy wire to the outside of the brim. That way, I could turn up the sides of the brim a bit. I covered the wire with ruched strip of fabric. Adding lots of tulle around the crown gave it the wide shape of the early 1900's. I also added some flowers.

With still some time left, I decided I wanted a more upper class alternative to the shirt and bow. I made a new dip waist belt, with a pointed front and back. It is made from thin wool. I drafted it, made a mock-up and tried it on, adjusted the shape a bit, and made it up. It is boned with rigilene in front, sides and back, to keep its shape. The closure is of the working-but-wrong sort: I just used two hairpins to keep it closed, in channels at center front. Invisible and fast, and I did not feel like adding buttons and loops for them.

 While I was at it, I also made a simple black faux leather belt, to wear with the shirt. The seam allowances is glued down instead of sewn, it is boned in the front, and it has the same hair pin closure.

Then, I decided to make a bolero. Generally, I do not like boleros, but for this era, they give a nice silouette. I started with the same pattern as the shirt, shorteded it, made a toille and made it a bit more fitted in the back, and made it up in the real fabric. Suprisingly fast, until I saw that the fit was horrible in the back. I had to unpick in, make seams in the side back, and generally fiddle around a lot, before I decided it would have to do. For decoration, I used strips if the selvage, that had contrasting colors, and sewed three rows down the front.

With only one day left, I convinced myself that it was not a good idea to make a lace blouse to go with this. Instead I found a modern blouse in my wardrobe that looked decently Edwardian. In the photos, I wear my big petticoat, a bum pad, corset and bust pad, and a corset cover. (I am very much a fan of using padding rather than tight lacing to get more curves!) I also have thin leather gloves and a small bag I think my grandmothers mother used.

Photos by Olof Tengstrand, from the turn of the century day as Marstrand last weekend. 
Posing at the old fortress, built during 17th-19th century:
A stroll with a friend:


 Ladies admiring a beautiful car:

I stuffed a leg from tights with hair rats, and made a circle of it. Then it was quite easy to pin my hair over this, and get the large gibson girl hairdo. 


We got a private tour of a beautiful steam ship. I doubt the engine room had ever seen ladies dressed in lace, velvet and large hats before...


Facts:
What the item is: ca 1903-1906 bolero, belt, hat.

Fabric: Thin wool for bolero and belt. Polyester tulle for hat.

Pattern: none, drafted and tested.

Notions: Polyester thread. Straw hat, paper and fabric flowers.

How historically accurate is it? The look is good. Bolero construction is plausible (machine seamed but lining stiched in by hand). Hat is just made up to look decent. I am not sure a straw hat would be used as a base for a fancy hat like this, it might have been more for everyday or sporting outfits.

Hours to complete: 1.5 h for belt. 3 h for hat. 7-10 h for bolero?
 
First worn: at turn of the century day at Marstrand 22-23 Aug

Total cost: 0, as all fabric was gifts or left over from other projects.


söndag 3 maj 2015

1905 blouse and skirt


Finished my 1905 blouse and skirt, and went for a photo session in Gamla Linköping. The skirt is a Truly Victorian pattern, and the blouse is drafted by me after looking at old pattern drawings and pictures. I had some difficulties trying to figure out how collars of this type were made. Were they usually attached or removable? In the end, I made an attached collar just like on a modern shirt, but drafted to be higher. I tried to use the instructions in the book Authentic Victorian Dressmaking Techniques, a reprint of a 1905 sewing book. I ended up not following them for all the way, both to save some time and because the instruction was not always easy to understand for someone without the background knowledge a contemporary reader/seamstress would have had.

There is some very nice photographs from London 1906 here, that I used as inspiration of real people. It was very useful to see pictures of real people doing things, not just fancy fashion plates.

One of my inspiration pictures: from The Delineator, June 1906: 

And more pictures from the photo session:


The hat is not accurate for this time, I just put it together very quickly to have something to wear for the photo session. I have ordered a pattern and will make a nice big hat soon :-)

I like very much how this turned out. I even wore it to work one day! After all, one  of my collegues had asked when they would get to see one of my costumes... And as this outfit is meant to be something that a girl working at office or as a teacher could wear, it was quite fun to wear to office.

And the HSM facts:

What the item is (and what practical things you can do in it): Skirt and shirt ca 1905. I think it could be a type of clothing worn by a women who worked, for example as shop girl or teacher.

The Challenge: #5 Practicality

Fabric: Wool for skirt, cotton poplin for blouse

Pattern: TVE21 for skirt, self drafted for blouse

Year: 1905

Notions: Thread and buttons, hooks and eyes

How historically accurate is it? Skirt is quite accurate, based on Truly Victorian. Blouse: drafted based partly on an historical pattern, but based on a modern bodice block. Collar drafted as a modern one, I don't know how similar this is to a period collar. Construction followed historical instructions for a while, after that I just made it up as a modern skirt.

Hours to complete: 10 h for blouse (first time making a shirt, so without a pattern it took a while to figure out how to construct stuff like buttoning and collar..) 4 h for skirt.

First worn: for photo shot last week, and then to work last monday.

Total cost: about 300 sek, 35 $

söndag 1 mars 2015

1903 Petticoat

Me trying to pose with proper s-bend in the new petticioat
First, all the facts for Historical Sew Monthly.

What the item is: 1903 petticoat.

The Challenge: #3 Stashbusting: Make something using only fabric, patterns, trims & notions that you already have in stash.

Fabric: Vintage sheet with lace and embroidered monogram from my husband's grandmother for skirt and flounce. A softer modern sheet from my grandmother for the flounces. A woven design from what was left of a table cloth I made a blouse of ten years ago, used as decoration.

Pattern: Truly Victorian 1903 Trumpet Skirt (TVE21), with added flounce and ruffles, based on petticoat advertisement pictures. I first made up the skirt, and put a ruffle on the bottom of it. I then added a flounce that also has a ruffle on it.

Year: works  for 1900-1905

Notions: Polyester thread. Hook and eye.

How historically accurate is it? The arrangement with flounce and ruffles is period. I think cotton could have been used for an under petticoat as this, but wool or silk would maybe have been more common? Machine sewing is ok. I did not use period construction methods.

Hours to complete: ca 10 h.(It took quite long time to make all those ruffles, and put on the lace and band decoration. I asked myself quite a few times why I had decided to put a ruffle on a 4 m long flounce...)

First worn: for photo yesterday.

Total cost: 0, as all fabric was gifts or left over from other projects.

 First: I love my hemming presser foot! I works well for the thin fabrics I used for ruffles. Without it would have been quite tedious to hem 10 m of ruffle fabric. (For the second ruffle I cheated and the used selvage instead of hemming.)
Hemming ruffles


 And then: more pictures!

Petticoat before flounce and ruffles
The skirt without any ruffles or decoration except for the tucks. Up to this stage, it went quite fast. Then ruffles occured...

And the finished petticoat, worn over the corset and corset cover, and a bum/hip pad.

Finished petticoat


 The decoration: tucks, a band cut from what was left of an table cloth , and lace (or what it is called) insert. The petticoat seems to give volume quite well! Remains to see how effective it is when a skirt is worn on top of it.


The flounce with its ruffle, and the ruffle on the skirt under.

It is not so visible in the picture, but the flounce has my husband's grandmother's embroidered monogram on it.


I surprised myself a bit when I decided to put some extra effort into this petticoat, to make it look nice, not just give the proper shape. Normally I just make the under layers simple and functional, to get on with the layers to be seen. But now, I had some inspiration from fellow costumers, that really inspired me to do something extra with this. It was fun! But now I am wondering if I might perhaps be able to use this as a summer walking skirt, if I make a matching blouse and a belt. What do you think? Would it look too much like underwear?

måndag 2 februari 2015

HSM #1: Foundations

The Challenge: #1 Foundations
Fabric: Medium weight cotton canvas
Pattern: Truly Victorian 1903 Edwardian Corset
Year: 1903
Notions: Polyester thread, grommets, cotton bias binding, steel busk, steel and plastic boning from stash
How historically accurate is it? As far as I know, the pattern and shape is very period. It is also very period to use the extra padding in the top that I needed to put in... I'm only interested in getting the right shape for the outer garments, so I just followed instructions in the pattern, and used what I had at home.
Hours to complete: 10-20?
First worn: Not yet, as I need outer garments first...
Total cost: around 30 $
And the staring-face picture:


In its finished state, the fit of the corset seems good enough. There was some some confusion along the way thou. The pattern stated that this kind of corset could not, and should not, be fitted with a mock-up, as the point of the corset is to shape the body and change the posture, and all the boning is needed for that. So I promptly ignored that advice, made a mock-up, put a fake busk (a wooden ruler...) in front, and saw that the fit was really weird. The hip and waist was good, but it was way too big over the bust. I re-took the measurments, and they were correct. Mysterious.


I then realized that I should probably do as the pattern said, threw away the mock-up, and made up the corset properly. It was still just as big. Is was very common back then to use padding in the top, to get the large pidgeon-bust, but this seemed a bit excessive. Fortunately, it was possible to make a dart in the bust cups, to make it a bit closer to me. I still use padding both over the hips and at the bust, to create more curves without having to sqeeze the waist. I'm not fond of corsets, so this actually has my natural waist size. This one is meant more to hold the padding than to move things around.

I also made a quite ugly corset cover. It is just meant to be something to put enough ruffles on so that the top of the corset does not show through the blouse, and to add a bit more to the pidgeon breast look. It is historically correct to have ruffles, but otherwise I just made it up as simple as possible. That is probably not historically accurate - this period seems fond of pretty elaborate lace creations for underwear.


 Perhaps it is obvoius that I am not that fond of making the foundation wear? Maybe I should learn to stick to one time period, so I don't have start all over with corset and underskirts...